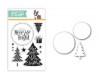
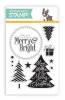
Oh my goodness...Simon Says Stamp has released their Holiday stamps, dies and stencils today...Christmas is officially here with this collection HERE! It is WONDERFUL and I have been having SO MUCH FUN!! I have so many cards to show you...will start with a couple cards I made using a set of stamps, Merry Trees and coordinating dies, Suspension Tree. When I saw the name on the die...I thought...hmmm...suspension...I think I need to suspend the tree...so that's what I did :)!! Just so you know...I have a pic tutorial to let you know how I made these...so the post will be a little long!...


.

 For those of you who stuck through to this point...yeah you!! I know a bunch of steps, but all of them short and easy...so much fun!! I will have a couple more cards to show you a bit later...cannot contain my excitement:)!!! Thanks for visiting me today!!
Hugs!! Lisa
For those of you who stuck through to this point...yeah you!! I know a bunch of steps, but all of them short and easy...so much fun!! I will have a couple more cards to show you a bit later...cannot contain my excitement:)!!! Thanks for visiting me today!!
Hugs!! Lisa

A close up...

Second one in traditional Christmas colors...

and a close up...but of the other red/green/white tree, you'll see I made two...

I had made the multi colored one when I thought to let you know HOW I made it...so I made the red/green/white striped one(s) to show you....
***CLICK ON PIC TO MAKE LARGER TO SEE BETTER***

I used strips of paper, adhered them to a piece of paper and die cut the tree from the striped paper(I could die cut 2 trees, so I made 2 cards:)!!).

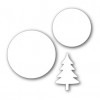
Then I used the Suspension Tree circle part of the die and die cut 2 circles from red paper.

Here are the two die cut circles...one for each card.

I then used a static bag, to make sure that the embossing powder would not stick, stamped the ring with versamark ink and white embossed.

Here are the two rings stamped and embossed.

I then cut a tiny piece of the trunk off the bottom of each tree so they would swing without problem.

I used my paper piercer to make holes in the tops of the trees and in each ring.

I DID layer the rings with 2 more layers for a little heft. You see the wires...2 pieces of gold wire (26 gauge wire) for each tree and ring, using one piece of wire to tie the tree to the ring, one piece to hang the ring to/from the card.

THIS is where I hope you can stay with me. I took two circle dies from the MFT circle stax dies, one a little bigger than the red ring and the other, bigger than that. These are used to cut circle holes in the cards from which the circle/tree will hang.

Using the smaller of the two dies, I placed the die over BOTH the top white panel AND the white card after lining them up...die cutting both at the same time. Doing this will insure that the die cut circle will be in the exact same place on both pieces of white paper.

The bottom white (the card) was not cut all the way through...TOTALLY OK...

NOW...place the LARGER circle die OVER the smaller impression on the CARD ONLY and die cut.

You can see from this pic that the larger die cut circle goes beyond the lines of the smaller almost die cut circle. I did this, because I didn't want the die cut circle of the card to be seen AT ALL when I put the card together, so I made that circle larger. Hope that makes sense:).

So now, the card looks like this. The step I DON'T show you is the stamped sentiment, which you would do at this point (I used Stampin Up Poppy Parade and Melon Mambo)

Then, I flipped the panel over, and used pop up squares to adhere the ring/tree in place and pop up the panel on the card.
I adorned with some colored Doodlebug sprinkles and Basic Grey candy buttons(which I LOVE and bought in almost every color...did I say I LOVE them?...LOVE THEM!! You will see them tomorrow, too!)...The finished card...

 |  |  |  |  |
 |  |  |  |  |
 |  |
WOW!
ReplyDeleteThis is lovely! Thanks for the tutorial Lisa!
This is so cute! Thanks for the tutorial! LOVE!
ReplyDeleteThis is fabulous! Thanks for the detailed directions!
ReplyDeleteThese cards are so delightful, they really made me smile.
ReplyDeleteClearly a work of LOVE - so pretty!
ReplyDeleteGorgeous cards! Thanks so much for the tutorial!
ReplyDeletehi lisa, beautiful card and thanks for the tutorial
ReplyDelete
ReplyDeleteI am a fan of reading to add insight to information.
Thank you for this great blog. this is here, the few months I am visiting and following you.
ReplyDeleteReally nice post. Thank you for posting something like this. Keep it up!
ReplyDeleteExcellent post. I was checking constantly this blog and I am impressed!
ReplyDeletethis content is valuable and simple, I’ve learned a lot here.
ReplyDeleteI’ve got you saved as a favorite to look at new stuff you post…
ReplyDeletei could assume you’re an expert on this subject.
ReplyDeletethis post is truly a nice piece of writing, keep it up.
ReplyDelete